October 17, 2014

Control an Arduino with the TI ez430 Chronos Watch

Wearable technology is all the rage at the moment, and you can also join in the fun without going to ridiculous levels of expense. One interesting example that has flown under the radar so far is by Instructables member laxap, who demonstrates how to use the Texas Instruments ez430 Chronos watch with an Arduino equipped with a USB host shield.

Included with the watch is a wireless USB dongle which is connected to the USB host shield. With this and the included code your Arduino can receive the three-axis acceleromter and button status data form the watch. With this datayou can then have your Arduino take actions based on the movement of and/or the buttons pressed on the watch. Neat!

For complete details, check out the project's Instructable page. And for more, we're on facebookGoogle+, and twitter - so follow us for news and product updates as well.

Another way of interfacing devices such as the TI watch mentioned above is with a board that has an integrated USB host shield, such as our Freetronics USBDroid:

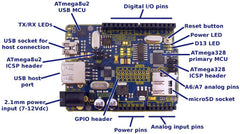
Apart from being a fully Arduino Uno-compatible, it has onboard microSD socket and the full USB socket and host-mode controller. As well as the Bluetooth application described above, this is the ideal platform for developing peripherals or projects based around Android devices with ADK (Android Developer Kit) functionality, but without requiring a USB host controller shield stacked onto an Arduino. For more information and to order, visit the product page here

October 17, 2014

Easily check your home's public IP address with Arduino and Android

Home automation with Arduino is surprisingly easy, and remote-control via the Internet is also possible. However doing so requires knowing what the public IP address of your home connection. In most cases this address is dynamic, that is it changes at the whim of your ISP - and thus you need to change it in your remote-control app (etc) as required.

This can be a pain, however one solution is the use of an Arduino and a small Android app by Instructables member xlisus. They've provided a small sketch to run on an Ethernet-enabled Arduino which is connected to your home router, which broadcasts the public IP back to the Android phone via WiFi and the router. This is then accessed via the Android app.

You can check out the Android app in Google Play, and rest via the Instructable page. And for more, we're on facebookGoogle+, and twitter - so follow us for news and product updates as well.


When putting together your next Internet-enabled Arduino or AVR project - save time, space and money with the  Freetronics EtherTen . Apart from being fully  Arduino Uno-compatible , it has onboard Ethernet, microSD socket, full USB interface (so you don't need a costly FTDI cable just to upload a sketch!) and supports optional  Power-over-Ethernet.

October 16, 2014

The Arduino-powered "Experimental Form Radio"

Interaction and Industrial Design student Yaakov Lyubetsky has taken a look at how a radio is operated, and noted that although the technology behind how a radio works has changed - the user interface has remained somewhat constant. With this in mind he's created a new radio that functions as expected, however with an imaginative interface.

Yaakov's version of a radion works when it has been placed onto a custom wall bracket, adding a sense of occasion to using the radio. Then by sewing conductive thread into flexible fabric, he's created a touch-controlled volume and frequency-changing interface which could be quite intuitive and easy to use. For a full demonstration of the radio, check out the following video:

This project is a great example of what imagination and some simple hardware can provide, of which you can learn more through Yaakov's interesting website. And for more, we're on facebookGoogle+, and twitter - so follow us for news and product updates as well.

If you're looking for an Arduino Uno-compatible board to embed into various projects, choose what tens of thousands of others have done and use our Freetronics Eleven - the Arduino-Uno compatible with low-profile USB socket, onboard prototyping space and easy to view LEDs: 

October 16, 2014

New Tutorial - Bluetooth Pairing Guide

As part of our continuing efforts to provide guides and tutorials for our product, our latest is the Bluetooth Pairing Guide for our new Freetronics Bluetooth Shield for Arduino. Using this guide you can see how easy it is to connect your Bluetooth-enabled PC to our Bluetoosth shield, and we've explained the process for three major operating systems - Windows, MacOS and Ubuntu Linux.

Once paired, you can send and receive serial data between your PC and shield, making remote control and data gathering that much simpler using a wireless link. To learn more, check out the Pairing Guide (and also the Quick Start tutorial). And for more, we're on facebookGoogle+, and twitter - so follow us for news and product updates as well.

And this is what it's all about - our new Freetronics Bluetooth Shield:


We've made it simple to use - the Bluetooth Shield acts as a serial link between the other Bluetooth device. Furthermore there's a wide range of jumpers allowing you to select which digital pins to use for data transfer, increasing compatibility with other shields. And with our Quick Start guide it's easier than ever.

Our Bluetooth Shield for Arduino is now in stock and ready to ship, so for more information and to order - visit the shield's product page.

October 14, 2014

The home-made elevator powered by Arduino

Controlling motors and working with sensors and an Arduino isn't new, and we've all spent some time experimenting with these. However these skills can translate to projects on a larger scale to solve problems of a more expensive type. One though process lead to the creation of a home-made elevator, built by the team at usb-e-kits.

They designed and built the metal frame, drive system and Arduino-based electronics for a three-storey elevator for use in a private home. The car is moved via a classic 1kW motor with bidirectional control that was hacked with some relays for control by the Ardiuno, and the elevator has the required sensors to ensure the car stops at the required point. You have to see it to believe it, so check out the following video

That's incredible, and shows what you can make with the right motivations. For more details check out the project Instructable page. And for more, we're on facebookGoogle+, and twitter - so follow us for news and product updates as well. 

Have you been reading about Arduino and would like to understand more so you can work with projects like the example above, but not sure where to start? Then order one of our Experimenter's Kit for Arduino - as used in many classroom and learning environments:

The package includes a wide variety of parts, sensors and modules including: a servo motor, lights, buttons, switches, sound, sensors, breadboard, wires and more. Furthermore a Freetronics Eleven Arduino-compatible board is included to make this an extensive hobby experimenter, inventor and starter kit. 

However we don't leave you alone to figure it all out, included is a great project and instruction booklet, plus access to a supporting web page and software examples. In other words - this is everything you need to get started for a fun range of electronics and Arduino related projects! So to get started or for more information and to order, check out the product page.

October 14, 2014

Push data from an Arduino to Google Docs with PushingBox

It's always great to see more examples that show how easy it is to send data from an Arduino across the Internet without much effort, and this example by Instructables member ezoom404 is just that.

They show us how to capture data (in this example from a temperature sensor) and send it to Google Docs via an Ethernet-enabled Arduino or compatible board and the "PushingBox" cloud-based notification service. Apart from Google Docs you can create notifications for all manner of platforms and devices, allowing your Arduino to alert you directly of a pre-determined situation.

Getting started is easy, with the first step being the project Instructable page. And for more, we're on facebookGoogle+, and twitter - so follow us for news and product updates as well.


When putting together your next Internet-enabled Arduino or AVR project - save time, space and money with the  Freetronics EtherTen . Apart from being fully  Arduino Uno-compatible , it has onboard Ethernet, microSD socket, full USB interface (so you don't need a costly FTDI cable just to upload a sketch!) and supports optional  Power-over-Ethernet .

October 13, 2014

Now available - Freetronics CNCPlotter Stepper Motor Controller

Originally designed for the Arduino mini-conference that ran along with the 2013 Linux Conference, we're now making this useful motor controller available for general sale. With the CNCPlotter and some simple woodwork you can make your own CNC (for "computer numerical control") device - such as a motorised router, engeaver, cutter or drawing machine:

Furthermore at the CNCPlotter is an Arduino-compatible device, so the CNCPlotter is a fantastic general purpose board for any project that uses stepper motors. You can use it as the brain of your next robotics project! A quick demonstration of the HackCNC at work in drawing mode can be seen in the following video:

With the large 20 x 4 character LCD, microSD card socket, touch-screen interface and onboard motor controllers, the CNCPlotter offers you all sorts of interface and motor control options in a compact design.

It's fully assembled and ready to work - you can find out more about the orginal CNC design from the project github page, and for all the details on the CNCPlotter and to order, visit the product page.

October 13, 2014

Build a personalised Word Clock with Arduino

"Word Clocks" are popular projects that are not only a reasonable challenge to build, they provide a useful function as any normal clock would do. However they're open to modifications and one neat example is to program the clock with personalised messages for the end user when the clock is a gift.

Instructables member TechKiwi did just that, and took advantage of an Arduino Mega-compatible board to make addressing the muititude of LEDs simple thanks to the extra GPIO on the Mega. We really like the level of detail provided for the hardware construction along with the schematic, so with a weekend or two you can make your own version without too much effort, for example:

 For all the details, check out the clock's Instructable page. And for more, we're on facebooktwitter and Google+, so follow us for news and product updates as well.

The most important part of any clock or timer-based project is the inclusion of an accurate real-time clock IC. Here at Freetronics we have the Maxim DS3232 real-time clock IC module:

Apart from keeping accurate time for years due to the temperature-controlled oscillator and having a tiny coin-cell for backup, it is very simple to connect to your Arduino project. A driver library allows your program to easily set or read the time and date. Perfect for clock projects, dataloggers or anything that needs to know the date and time. Furthermore it contains a digital thermometer and 236 bytes of non-volatile memory to store user settings and other data. For more information, check out the module page here.

October 13, 2014

Remotely monitoring tank levels with Arduino and Xively

Monitoring tank levels of vital fluids for the home or business can be a difficult task, in some installations the level gauges can be older and inaccurate, or just not work that well. Which oftens leaves the user with filling up smaller amounts on a frequent basis to avoid runnning out, or using haphazard guesswork to determine the levels.

However with an Ethernet-enabled Arduino or compatible and some inexpensive sensors you can remotely monitor tank levels over the Internet, and at a much higher accuracy. This has been demonstrated by Arduino forum member dpslusser who uses an ultrasonic didtance sensor placed over the top of a tank to accurately determine the level of the contents.

With a prior understanding of physical tank levels and volume, an Arduino sketch can calculate the volume and report the level to the online service Xively - which can then convert the data into web-enabled dashboards for remote monitoring.

This project has many applications, from water to waste tanks, fuel and more - so login to the Arduino forum for more information and discussion. And for more, we're on facebookGoogle+, and twitter - so follow us for news and product updates as well.

When putting together your next Internet-enabled Arduino or AVR project - save time, space and money with the  Freetronics EtherTen . Apart from being fully  Arduino Uno-compatible , it has onboard Ethernet, microSD socket, full USB interface (so you don't need a costly FTDI cable just to upload a sketch!) and supports optional  Power-over-Ethernet .

October 11, 2014

Upgrading an original Game Boy with Raspberry Pi

As one of the first hand-held gaming units of note, the Nintendo Game Boy was incredibly popular and entertained millions of people from the early 1990s. However as technology marches on it was swept by the wayside thanks to other mobile gaming platforms. However they can find a new life, and one example has been created by Instructables member TimG1967 who rebooted his with a Raspberry Pi.

This is an interesting project, as the creator has not only managed to squeeze in a Raspberry Pi model A, a colour LCD and rechargeable battery - he's stayed true with the orginial controls and indicators. That is the cross pad direction buttons, A, B, select and start are all used along with the analogue volume control and indicator LEDs. With the addition of some emulation software, classic games can be played in modern colour with the neat hack.

For a well-documented example of the build, visit the project page. And for more, we're on facebookGoogle+, and twitter - so follow us for news and product updates as well.

If you're creating portable electronic projects and work with Lithium-Polymer or Lithium-Ion batteries, it can be difficult to build a safe and simple charger. Instead save time and risk by using our USB LiPo charger module:

It's the convenient smart charger for 3.7V cells: just plug in your cell and a USB power source such as a mobile phone charger or computer, and you're done. And it includes a smart LiPo management chip that regulates the charge rate and detects when the cell is charged. Maximum charge rate current limit can be set using solder jumpers to suit your particular LiPo cell. For more details and to order, visit the module home page