October 11, 2014

Build an electronic finish line for Hot Wheels cars with Arduino

After spending time with his son using "Hot Wheels" toy cars and their racing tracks, Ted Meyer came up with a neat way to determine the winning car using an Arduino and some simple circuitry.

By placing infra-red phototransisor pairs under the point of the finishing line for the pair of tracks, an Arduino can easily detect when they're bridged and thus which car went past first. The winning car is indicated by an LED, as shown in the following video demonstration:

You could also use this type of system to build a lap-counter for slot cars or other model applications with a little effort. However for more information on this project visit the Instructable page.  And for more, we're on facebookGoogle+, and twitter - so follow us for news and product updates as well.

If you're looking for an Arduino Uno-compatible board to embed into various projects, choose what tens of thousands of others have done and use our Freetronics Eleven - the Arduino-Uno compatible with low-profile USB socket, onboard prototyping space and easy to view LEDs: 

October 09, 2014

"BigNumbers" - a new Arduino character LCD font

Using character LCDs with Arduino is quite common-place, however after a while some users become tired with the fixed fonts available and reach the limits of what is possible.

However with some effort more is possible, and github user seanauff has created a new library to easily create numbers that are two rows high and much wider, as shown in the following example:

The font is comprised of custom characters, and is quite imaginative considering the limitations of the screen. The libary will be useful for many purposes, and can be downloaded from github. And for more, we're on facebookGoogle+, and twitter - so follow us for news and product updates as well.

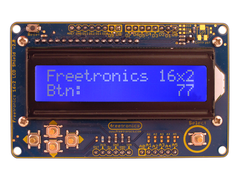
Looking for a rapid-use LCD for your Arduino or compatible projects? Save time and move forward with the Freetronics LCD & Keypad shield which contains a bright 16x2 character LCD and five buttons that can be read from only one analog input pin:

October 09, 2014

Display Android phone information using external displays with Arduino

Sometimes you may not hear when a call or SMS is received by your phone, thanks to not having it with you all the time in the office or home - or you may have left it on "mute" and thus have no chance of knowing. Instructables member zmashiah had this problem and solved it with a neat mixture of Arduino and Bluetooth.

His custom Android app can poll the phone for missed calls, SMSs and battery level - and sends the data over Bluetooth using serial data. This is then received by an Arduino which is connected to a display of some sort - and in the example below to some large 7-segment LED displays. This can be mounted somewhere useful and will then update to match the live missed call/SMS data from the phone.

The code for Arduino and Android is supplied, so you can work with this to create your own version. To get started, visit the project's Instructable page. And for more, we're on facebookGoogle+, and twitter - so follow us for news and product updates as well. 

Have you been reading about Arduino and would like to understand more so you can work with projects like the example above, but not sure where to start? Then order one of our Experimenter's Kit for Arduino - as used in many classroom and learning environments:

The package includes a wide variety of parts, sensors and modules including: a servo motor, lights, buttons, switches, sound, sensors, breadboard, wires and more. Furthermore a Freetronics Eleven Arduino-compatible board is included to make this an extensive hobby experimenter, inventor and starter kit. 

However we don't leave you alone to figure it all out, included is a great project and instruction booklet, plus access to a supporting web page and software examples. In other words - this is everything you need to get started for a fun range of electronics and Arduino related projects! So to get started or for more information and to order, check out the product page.

October 08, 2014

Control DC motors from an Android device with Arduino and Bluetooth

Once again Rui Santos describes what seems to be a complex topic in simple terms, and in this example he shows us how to control DC motors from an Android device via Bluetooth.

An Arduino or compatible board with a DC motor and control circuit or shield is also fitted with a serial Bluetooth device, which receives commands from an Android app that's created with the free MIT App Inventor. This also gives the maker freedom in designing the user-interface on the Android app thanks to the easy coding. Rui gives us a demonstration in the following video:

The commands from the Android device is in the form of simple serial text, and the Arduino could also send feedback data back for a more interactive experience. However for an easy start check out Rui's website. And for more, we're on facebook, twitter and Google+, so follow us for news and product updates as well.

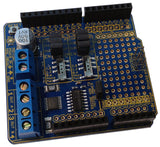
 There's so much you can do with an Arduino and motors - and the base of any project is a solid motor shield - such as our HBRIDGE: DC/stepper motor shield. Based around the powerful Allegro A4954 H-bridge driver IC you can control two DC motors with complete ease, or one bipolar stepper motor. With connections for external power management, a complete beginners' guide and documentation - motor control couldn't be any easier. For more information and to order, visit the HBRIDGE: page.

October 08, 2014

An inexpensive prosthetic claw powered by Arduino

After being denied a full prosthetic hand by his health insurer, Instructables user tankapotamus came up with an inexpensive replacement by making a robotic claw "hand" that is fitted to the end of his prosthetic arm. 

By adding a strong servo to an inexpensive claw mechanism that can be found from various retailers, the claw could then be controlled by an Arduino and the user has fitted a rotary encoder that can be used to adjust the claw. This is demonstrated in the following video:

Kudos to the creator for coming up with a practical solution for an unfortunate problem. For more details and information, check out the project page. And for more, we're on facebooktwitter and Google+, so follow us for news and product updates as well.

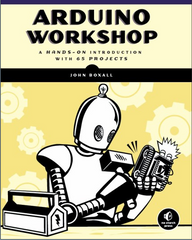
If you're looking to learn how to use an Arduino with sensors, servos, LCDs and much more - you can't go past reading a copy of "Arduino Workshop -  A Hands-On Introduction with 65 Projects” by John Boxall.

Arduino Workshop takes the reader from having zero knowledge about the Arduino platform, electronics and programming and leaves them with the know-how and instructions on everything from blinking an LED, to robotics, wireless data, cellular communications, motor control, sensors, Internet connected systems and more. For more information including a sample chapter and table of contents, visit the book page.

October 07, 2014

Add remote control to LED lighting with Arduino and Bluetooth

Adding remote control via Bluetooth to an Arduino-based project is quite simple, thanks to the ease of sending serial data between two Bluetooth devices. This has been demonstrated by Arduino forum member Javier who shows us how to control household LED lighting with his Android device and an Arduino.

A simple Arduino app has been created that has a neat interface and sends matching serial commands via Bluetooth which are received by the Arduino and a matching Bluetooth module, at which point the LEDs can be controlled in the same manner as any other situation. A quick demonstration of this is shown in the following video:

For more information and discussion about this project, visit the Arduino forum. And for more, we're on facebookGoogle+, and twitter - so follow us for news and product updates as well.

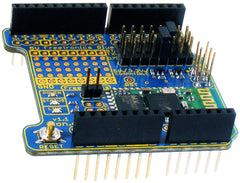
As part of the Arduino and Bluetooth experience you'll need a Bluetooth device for your Arduino projects, and to meet this need we've released our new Freetronics Bluetooth Shield:


We've made it simple to use - the Bluetooth Shield acts as a serial link between the other Bluetooth device. Furthermore there's a wide range of jumpers allowing you to select which digital pins to use for data transfer, increasing compatibility with other shields. And with our Quick Start guide it's easier than ever.

Our Bluetooth Shield for Arduino is now in stock and ready to ship, so for more information and to order - visit the shield's product page.

October 07, 2014

Decoding and duplicating wireless RF data with Arduino

After being unhappy with the performance of his wireless thermostat, Steven Hale was motivated to create his own control system would communicate wirelessly in the same manner as his original unit to the heating system in his home. After determining the wireless link between the two was a simple 433 MHz RF data link, Steven captured the output from the transmitter using a PC and identified the pulses sent.

Then it was a simple matter of using an inexpensive 433 MHz transmitter unit and an Arduino to recreate the signal and now the boiler can be controlled by the Arduino. This has given Steven the framework to make his own Arduino or PC-controlled heating system which can be much more relevant to the residents of his home.

Doing so seems difficult however thanks to Steven's article you can sniff out RF signals yourself, so visit his website to get started. And for more, we're on facebook, twitter and Google+, so follow us for news and product updates as well.

If you're looking to work with your own RF wireless hardware, but don't want to make your own receiver circuit - check out our range of  315/433 MHz receiver shields:

Apart from being idea for working with the various low-cost data links on the market, the shield can also be used to capture wireless weather station data, as described in the book "Practical Arduino". For more information and ideas, check out the product page

October 06, 2014

"PIP" - the Arduino Web Browser

And now for something we've never considered using an Arduino for comes "PIP" - the web browser for Arduino. Created by hackaday.io member glichrist, the browser can render and display HTML-based pages with an Ethernet-enabled Arduino board and display the results using most popular displays such as an OLED. With the use of an analogue joystick the user can navigate the pages and browse like it's 1993.


On a more serious note, this is a clever use of an Arduino and some very efficient coding to make it all possible, and the project still has more imrovements to be added. So for more information and to follow the progress, visit the hackaday.io website. And for more, we're on facebooktwitter and Google+, so follow us for news and product updates as well.

Looking for a small yet useful OLED display for your Arduino (or Raspberry Pi)? Then check out our 128x128 pixel OLED Module. With a diagonal size of 1.5" and 16,384 colours to select from, so almost anything is possible. Furthermore there's a microSD card socket, and removable tabs on each side which can hold LEDs and buttons:

And using the module is made simple - we have tutorials and drivers for both the Arduino and Raspberry Pi platforms - great for experimenters or those who use both systems. Furthermore, check out the forum where members are already creating modified drivers to rapidly increase the display speed. For more information including our Quickstart guides - and of course to order - visit the OLED Module product page

October 06, 2014

Build an Ultrasonic Parking Distance Aid

A lot of new cars may have a whole range of ultrasonic sensors, camera, blind-spot monitors and so on - however may not be enought to warrant the upgrade of your motor vehicle if it's lacking in that department. However with a few hours you can make your own version of a parking sensor that can help guide you into the garage or other tricky parking sport just like the newer cards.

Created by Jin Choi the hardware is very simple - consisiting of an Arduino-compatible circuit, an inexpensive ultrasonic distance sensor and some bright LEDs. The sensor is directed towards the vehicle's approach direction and flashes the LEDs in various ways to indicate how far the bumper is from the wall or other object. Jin's project is simple, neat and works well -f ro example:

Furthermore we like how Jin has used a minimalist circuit and a 3D-printed enclosure for a neat finish. To make your own, including the code and design files - check out Jin's project page. And for more, we're on facebookGoogle+, and twitter - so follow us for news and product updates as well.

If you're looking for an Arduino Uno-compatible board to embed into various projects, choose what tens of thousands of others have done and use our Freetronics Eleven - the Arduino-Uno compatible with low-profile USB socket, onboard prototyping space and easy to view LEDs: 

October 03, 2014

Make a wall-mounted Google Calendar with Raspberry Pi

With technology becoming increasingly expensive there are many things that are starting to fall by the wayside, and one of those is the humble calendar. Many of us now rely on the calendar in Google Apps as it can be viewed and controlled from many devices. Alex Pine agreed with this and has documented how he created a wall-mounted Google Calendar display with a Raspberry Pi.

After finding a wall-mounted television in the kitchen of his new home, it was quickly replaces with an older inexpensive monitor and the Raspberry Pi, power and network connected. Controlling the Pi remotely is made easy by SSH and Alex explains this process alonhg with installing the required software.

This is a neat use of a Raspberry Pi and shows how easy it is to make your own customised interactive displays, so visit the project page to learn how. And for more, we're on facebookGoogle+, and twitter - so follow us for news and product updates as well.

If you need to connect external circuitry to your Raspberry Pi such as the game project above, consider our PiBreak board. It provides labelled breakout pins for all GPIOs, a large prototyping area with solder pads, and power rails for easy power connection:

Furthermore the PiBreak also includes mounting hardware to firmly attach it to your Raspberry Pi using a nut, bolt, and spacer - and is compatible with all revisions of both model A and B Raspberry Pi computers. For more information about our PiBreak board, our Getting Started guide, and to order - visit the product page.