October 31, 2014

Convert RC Tanks to Smartphone control with Arduino and Bluetooth

You can have a lot of fun with remote control toys, and even more fun once you've hacked them to do your bidding. One great example of this is by Instructables member jeneral who took an RC tank, determined how the motors were controlled and then substituted his own control hardware.

This consists of an Arduino, compatible h-bridge circuit to control the motors and a serial Bluetooth module. This allows the Arduino to receive commands in the form of serial text, which are generated by an Android app created with the free MIT App Inventor software. This combination of hardware and software gives full control of the tank to the Android device user, as shown in the following video:

This project is a great demonstration of how to control robotics from a smart phone, so visit the Instructable to learn how. And for more, we're on facebookGoogle+, and twitter - so follow us for news and product updates as well.

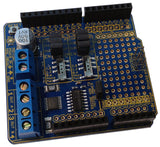
 If you're looking into starting with Arduino and robotics, such as controlling your own tank from your Arduino or compatible, check out our HBRIDGE: DC/stepper motor shield. Based around the powerful Allegro A4954 H-bridge driver IC you can control two DC motors with complete ease, or one bipolar stepper motor. With connections for external power management, a complete beginners' guide and documentation - motor control couldn't be any easier. For more information and to order, visit the HBRIDGE: page


October 29, 2014

Build a garage parking sensor with dashboard readout using Arduino

Many vehicles are fitted with ultrasonic sensors that let you know if you're getting too close to a wall or pedestrian, however the actual distance is not given. For those with a small garage this data can be quite useful when parking is tight, and thus a system has been created by Instructables member checho0180 to do just that.

Their system uses two Arduino-compatible circuits - one uses an ultrasonic distance sensor and a wireless data transmitter to send the distance measured between the wall and car to another circuit which is inside the motor vehicle, and displays the distance on an LCD - for example:

Then the driver can have a real-time display of the remaining distance when parking in a tight spot. For all the details, visit the project Instructable page. And for more, we're on facebooktwitter and Google+, so follow us for news and product updates as well.

If you're looking to work with your own RF wireless hardware, but don't want to make your own receiver circuit - check out our range of  315/433 MHz receiver shields:

Apart from being idea for working with the various low-cost data links on the market, the shield can also be used to capture wireless weather station data, as described in the book "Practical Arduino". For more information and ideas, check out the product page

October 29, 2014

Control your garage door with Bluetooth and Arduino

Although garage doors can be controlled with the typical wireless solution, more secure and controlled versions can be made with Bluetooth and also be controlled from a popular smartphone. The benefit of using this method is you don't need the manufacturer's remote control as the smartphone app can just be loaded on a new device.

Doing so has been documented by Instructables member arc20052000 who has build a two-channel remote relay solution with Arduino and Bluetooth. The remote control app has been written in Java however you could also create your own using the free Android MIT app inventor environment.

For more information and motivation visit the project Instructable page. And for more, we're on facebookGoogle+, and twitter - so follow us for news and product updates as well.

As part of the Arduino and Bluetooth experience you'll need a Bluetooth device for your Arduino projects, and to meet this need we've released our new Freetronics Bluetooth Shield:


We've made it simple to use - the Bluetooth Shield acts as a serial link between the other Bluetooth device. Furthermore there's a wide range of jumpers allowing you to select which digital pins to use for data transfer, increasing compatibility with other shields. And with our Quick Start guide it's easier than ever.

Our Bluetooth Shield for Arduino is now in stock and ready to ship, so for more information and to order - visit the shield's product page.

October 28, 2014

Programming your Arduino in assembly language

If you're bored with the abstraction of C++ that's used to write Arduino sketches, or you're up for a challenge and enjoy learning how things work in a much greater detail then one interesting option is to leearn how to program the microcontroller used in your Arduino or compatible in assembly language.

Although the thought of doing so may seem a little scary, after some reading and thought it really isn't that difficult at all - and thanks to the tutorials published by Instrucables user 1o_o7 you can get started pretty quickly. The example hardware is a minimal Arduino-compatble circuit, and the code is generated using a text editor and command-line uploader - no fancy IDE!

There are two tutorials so far, and with some encouragement the author will continue with the series, so visit their first chapter and give encouragement if you're enjoying them. And for more, we're on facebook, twitter and Google+, so follow us for news and product updates as well. 

If you're wanting to make your own Arduino-compatible project for the assembly language tutorials, you'll need an ATmega328P MCU:

This is the same Atmel AVR ATmega328P microcontroller used in the official Arduino Uno, as well as our ElevenEtherTenUSBDroid, and other boards. Perfect for building your own Arduino-compatible project directly on a breadboard or on a custom PCB, or for replacing the MCU in an existing board. Comes with the Arduino Uno bootloader pre-installed. Better still, it even has a special label stuck on top with details of the pinout, so you don't even need to look up the datasheet when connecting it up in your project! For more information and to order, click here!

October 28, 2014

Build a simple VT100 text display unit with Arduino

If you're interested in experimenting with older technology standards such as VT100 terminal emulation, or would prefer a portable unit to display serial text from your Arduino instead of using a connected PC then the following by Martin K. Schröder solves the problem nicely.

Martin has used an inexpensive Arduino-compatible board to receive incoming serial text that can also be encoded with VT100 escape sequences to allow easier formatting of the text on the screen or display used.

This is an interesting combination of the past and also a useful debugging device for portable mircrocontroller applications, so visit Martin's github page to get started. And for more, we're on facebooktwitter and Google+, so follow us for news and product updates as well.

Looking for a small yet useful OLED display for your Arduino (or Raspberry Pi)? Then check out our 128x128 pixel OLED Module. With a diagonal size of 1.5" and 16,384 colours to select from, so almost anything is possible. Furthermore there's a microSD card socket, and removable tabs on each side which can hold LEDs and buttons:

And using the module is made simple - we have tutorials and drivers for both the Arduino and Raspberry Pi platforms - great for experimenters or those who use both systems.

Furthermore, check out the forum where members are already creating modified drivers to rapidly increase the display speed. For more information including our Quickstart guides - and of course to order - visit the OLED Module product page

October 28, 2014

Add time-lapse to any camera with Arduino

Making a time-lapse photography controller for a camera with an Arduino isn't anything new, and most circuits can be complex as they either emulate an infra-red remote control or require hacking into an exisiting remote to control it via the Arduino's GPIO pins.

However with some simple thinking you can simply recreate the presence of a human, and this has been demonstrated by Instructables member Switch and Lever whose solution is to simply attach a servo to the side of the camera which can be activated to  physically press the shutter release on the camera. Doing so is simple, and it works. A demonstration is showin in the following video:

Sometimes the simple methods are often the best, so for more information check out the project's Instructable page. And for more, we're on facebooktwitter and Google+, so follow us for news and product updates as well.

If you're looking to learn how to use an Arduino with servos as well as sensors, LCDs and much more - you can't go past reading a copy of "Arduino Workshop -  A Hands-On Introduction with 65 Projects” by John Boxall.

Arduino Workshop takes the reader from having zero knowledge about the Arduino platform, electronics and programming and leaves them with the know-how and instructions on everything from blinking an LED, to robotics, wireless data, cellular communications, motor control, sensors, Internet connected systems and more. For more information including a sample chapter and table of contents, visit the book page.

October 27, 2014

Experimenting with sign language to speech with Arduino

Once could spend a limitless amount of time creating all sorts of fun devices with an Arduino and various parts, however this platform can also be put to some good an interesting use to help those different to ourselves. One example of this has been demonstrated by Instructables member tushar197 who has created a gesture-controlled voice playback device around an Arduino.

How it works is quite simple, an Arduino takes readings from an accelerometer - which have a matching, pre-determined meaning in the form of a basic sign language. Once a gesture is matched, a voice-playback circuit is activated which plays the audio matching the gesture. And thus the sign-language to speech experiment is successful, as shown in the following video:

Another great demonstration of helping others with an Arduino. For more details, check out the project's Instructable page. And for more, we're on facebook, twitter and Google+, so follow us for news and product updates as well. 

For those looking to recreate such a project - a good start would be our Eleven board along with the AM3X accelerometer module:

This tiny 3-axis accelerometer module can operate in either +/-1.5 g or +/-6 g ranges, giving your project the ability to tell which way is up. Ideal for robotics projects, tilt sensors, vehicle data loggers, and whatever else you can dream up. For more information and to order, click here

October 27, 2014

"Dottie" the Flip-Dot Clock

After coming across a commercial flip-dot display (as used in destination indicators and other displays that require excellent visibility in direct sunlight) David Henshaw spent considerable time and effort by adding Arduino-powered circuitry to convert the display into a neat clock.

The results are fantastic, and with enough circuitry (including a lot of H-bridge ICs to handle the change of polarity requried for each dot) the Arduino can individually control each dot in the display. This gives the user a great amount of freedom to create visual effects and display more than simple numbers. However as a clock the display is a success, a demonstration of which is shown in the following video:

For more information on "Dottie", visit David's interesting project log. And for more, we're on facebooktwitter and Google+, so follow us for news and product updates as well.

The most important part of any clock or timer-based project is the inclusion of an accurate real-time clock IC. Here at Freetronics we have the Maxim DS3232 real-time clock IC module:

Apart from keeping accurate time for years due to the temperature-controlled oscillator and having a tiny coin-cell for backup, it is very simple to connect to your Arduino project. A driver library allows your program to easily set or read the time and date. Perfect for clock projects, dataloggers or anything that needs to know the date and time. Furthermore it contains a digital thermometer and 236 bytes of non-volatile memory to store user settings and other data. For more information, check out the module page here.

October 27, 2014

"SpeedTrig" - the faster trigonometric library for Arduino

Although an Arduino may seem somewhat underpowered compared to a computer, it can still process quite complex mathematic work much faster than you can do so with a calculator. There are also examples of people making their own Arduino-powered caluclators, and with this in mind the following library by github user AnonymousPenguin is of interest.

Based on the work published by Arduino enthusiast Oscar Liang, this new library offers faster methods of calculating common trigonometric functions such as sine, cosine, arc cosine and so on. These sorts of functions will not only be useful for academic work but also have practical uses for navigation, autonomous robots and so on.

You can check out the library and download the code from the github page. And for more, we're on facebookGoogle+, and twitter - so follow us for news and product updates as well.

If you're looking for an Arduino Uno-compatible board to embed into various projects, choose what tens of thousands of others have done and use our Freetronics Eleven - the Arduino-Uno compatible with low-profile USB socket, onboard prototyping space and easy to view LEDs: 

October 24, 2014

Use a Raspberry Pi to display incoming SMS text messages

Thanks to the ease of connecting a large (or small) display to a Raspberry Pi - it can be used to display all sorts of data and look great on the largest of monitors or HDMI-capable televisions. This feature really benefits the following project by Vamsi Krishna, who demonstrates how to connect a SIM900-style GSM module to a Raspberry Pi - and display inbound SMSs.

This would be neat for parties, tracking status data from various GSM-equipped devices or just a neat way for groups of people to read messages if required. The particular GSM module used has a RS232 serial port, so connection with the Pi is with a simple RS-232 to USB cable. Then it's easy for the python software to communicate via serial text (to send AT commands for the GSM module) and so on.

For complete details for this interesting project, visit Vamsi's instructable page. And for more, we're on facebookGoogle+, and twitter - so follow us for news and product updates as well.

If you need to rig up some hardware interfacing to your Pi, it would fit nicely on our PiBreak board. It provides labelled breakout pins for all GPIOs, a large prototyping area with solder pads, and power rails for easy power connection:

Furthermore the PiBreak also includes mounting hardware to firmly attach it to your Raspberry Pi using a nut, bolt, and spacer - and is compatible with all revisions of both model A and B Raspberry Pi computers. For more information about our PiBreak board, our Getting Started guide, and to order - visit the product page.