November 13, 2014

The Raspberry Pi-powered motion-detecting camera

Thanks to the ease of connecting external camera and networking functions to a Raspberry Pi, it can be the centre of many useful projects. One example is by Instructables member talk2bruce whose motion-activated camera is simple to make and quite useful.

By using an inexpensive IR motion detector, the Pi can detect movement - and then record the ambient audio and images with a camera. These are then uploaded to the online Dropbox cloud-based storage service for remote analysus and retrieval.

The hardware is quite simple, and thanks to the provided python code you can be up and runnning in very little time, so to get started visit the project Instructable page. And for more, we're on facebookGoogle+, and twitter - so follow us for news and product updates as well.

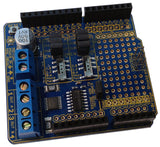
If you need to rig up some hardware interfacing to your Pi, it would fit nicely on our PiBreak board. It provides labelled breakout pins for all GPIOs, a large prototyping area with solder pads, and power rails for easy power connection:

Furthermore the PiBreak also includes mounting hardware to firmly attach it to your Raspberry Pi using a nut, bolt, and spacer - and is compatible with all revisions of both model A and B Raspberry Pi computers. For more information about our PiBreak board, our Getting Started guide, and to order - visit the product page.

November 13, 2014

The Steampunk Clock Top Hat

The steampunk concept of building devices to resemble items from the 19th century is a fun and interesting challenge, and one fine example of this has been demonstrated by Instructables member gfish with their clock in a top hat.

Time is kept with an Arduino-based system, which drives two servos to control the hands of the clock. In the steampunk fashion, over-sized gears are used between the servos and hands to create an external display mechanism that works. Furthermore a time-zone selection panel is included - and a GPS-based location mode that displays relative postition to a certain area using the clock hands. A full demonstration is shown in the following video:

A fun project, and complete details can be found here. And for more, we're on facebooktwitter and Google+, so follow us for news and product updates as well.

The most important part of any clock or timer-based project is the inclusion of an accurate real-time clock IC. Here at Freetronics we have the Maxim DS3232 real-time clock IC module:

Apart from keeping accurate time for years due to the temperature-controlled oscillator and having a tiny coin-cell for backup, it is very simple to connect to your Arduino project. A driver library allows your program to easily set or read the time and date. Perfect for clock projects, dataloggers or anything that needs to know the date and time. Furthermore it contains a digital thermometer and 236 bytes of non-volatile memory to store user settings and other data. For more information, check out the module page here.

November 13, 2014

Build an Arduino-controlled Robotic Bartender

Now that party season is slowly coming towards us, some interested enthusiasts may be looking for a way to mix the enjoyment of the hobby and something different to show off to others. One example of this is a robotic bartender, and following the detaila by Instructables member D_Vee you can make your own with a little effort.

The system is controlled by an Arduino or compatible board, with an LCD display and numeric keypad for the user interface. Six peristatic pumps are used to draw fluids are controlled by the Arduino depending on the drink recipe selected by the user. With a little timing calibration and priming the system can be quite effective, and used to generate all sorts of cocktails.

For more information, check out the project Instructable and drink responsibly. And for more, we're on facebooktwitter and Google+, so follow us for news and product updates as well.

If you're looking for a simple way to control many relays and thus pumps from your Arduino, without using up all your digital I/O pins - check out our Relay8:  driver shield:

So what is the RELAY8:? It's a great Arduino shield that allows you to drive up to 8 relays from your Arduino using just 2 I/O pins with this shield. It communicates with your board using I2C, so you can even stack several shields together to drive 16, 24, or more outputs! Includes back-EMF protection and works with a wide range of relays. Perfect for home automation projects! For more information and to order, click here.

November 12, 2014

Controlling vintage teletype machines with Raspberry Pi

After being fascinated by teletype machines for many years, Bob Coggeshall has demonstrated a method of controlling a vintage Model 15 teletype with a Raspberry Pi. Doing so is a lot simpler than you would imagine, apart from powering the TTY a simple 24V DC data line is controlled with a relay - which can easily be switched with an N-MOSFET and a GPIO pin.

Futhermore Bob has provied a simple HTML interface that can be accessed from an network-connected device, allowing text entry and controls of the TTY's power and features. It's a great way to understand the very basics of data transmission and also hardware to Raspberry Pi interfaceing.

For all the details including links to the required code, visit Bob's website. And for more, we're on facebookGoogle+, and twitter - so follow us for news and product updates as well.

If you're making a similar project and need to control large currents with digital GPIO - you'll need a MOSFET. We've got you covered with our NDRIVE: N-MOSFET driver/output module:

This high-power N-MOSFET module lets you switch high-current loads using a tiny microcontroller. Perfect for controlling that set of traffic lights mounted in your living room, electric motors via PWM and other automotive projects such as switching high-power 12V lights and high wattage LEDs. For more information and to order, visit the product page

November 12, 2014

The "Slowpoke" - an Arduino-powered microscale sliding stage

Whilst visiting a different university, Robert Zacharias was asked to build a microscale sliding stage - a device that can move a horizontal platform at an incredbly slow speed, in the range of between one and one hundred microns per second.

At first thought this might seem incredibly difficult, however with some effort and parts manufactured with extremely tight tolerances Robert rose to the challenge and completed the stage. The platform is moved with a stepper motor which can naturally be controlled very easily with an Arduino and an appropriate driver shield. A simple user interface with an LCD has been added so the control unit can be self-contained.

For more information about this fascinating device, visit Robert's website. And for more, we're on facebookGoogle+, and twitter - so follow us for news and product updates as well.

 If you're looking into starting with Arduino and robotics, such as controlling a stepper motor (or DC motors) from your Arduino or compatible, check out our new HBRIDGE: DC/stepper motor shield. Based around the powerful Allegro A4954 H-bridge driver IC you can control two DC motors with complete ease, or one bipolar stepper motor. With connections for external power management, a complete beginners' guide and documentation - motor control couldn't be any easier. For more information and to order, visit the HBRIDGE: page

November 11, 2014

Build a Frozen Pipe Alarm with Arduino

And now a project for those in much cooler climes than Melbourne - a frozen pipe alarm by Jason Poel Smith. This is quite a simple yet effective project, which uses a thermistor as a temperature sensor. This component changes resistance based on the temperature, so the change can be measured by an analogue input on the Arduino.

Once the analogue reading for almost-ice water is determined, the Arduino can alert the home owner through an almost infinite number of methods to get your attention. A quick run through of the project is shown in the following video:

To get tstarted, check out the project website. And for more, we're on facebook, twitter and Google+, so follow us for news and product updates as well.

If you're interested in measuring more ambient temperature levels, consider using our TEMP: DS18B20-based temperature sensor module:

which uses the Dallas DS18B20 1-wire digital temperature sensor, with a wide measurement range of -55 to +125°C at an accuracy of +/- 0.5°C. For more information, tutorials and to order - visit the TEMP: page.

November 11, 2014

Experimenting with Arduino and Morse Code

Although learning Morse code is no longer required to achieve your foundation amateur radio license (in Australia) the practice of commiunicating with it is still quite popular and there's still a lot of CQ activity out there to enjoy. With this in mind, Chris Weatherford has demonstrated how to create Morse code with an Arduino - and generate the output with LEDs and a buzzer.

The process uses a neat Arduino sketch, a string of text is taken to individual characters- each of which are then converted to the memorable tones and then played. A customised version could be used for those repeated initial calls, or perhaps as part of a larger training application.

For complete details, visit Chris' project page. And for more, we're on facebookGoogle+, and twitter - so follow us for news and product updates as well. 

Have you been reading about Arduino and would like to understand more so you can work with projects like the example above, but not sure where to start? Then order one of our Experimenter's Kit for Arduino - as used in many classroom and learning environments:

The package includes a wide variety of parts, sensors and modules including: a servo motor, lights, buttons, switches, sound, sensors, breadboard, wires and more. Furthermore a Freetronics Eleven Arduino-compatible board is included to make this an extensive hobby experimenter, inventor and starter kit. 

However we don't leave you alone to figure it all out, included is a great project and instruction booklet, plus access to a supporting web page and software examples. In other words - this is everything you need to get started for a fun range of electronics and Arduino related projects! So to get started or for more information and to order, check out the product page.


November 10, 2014

Make an Arduino Mega shield for research and testing

Over time you may have gathered one or more Arduino and compatible boards, and find yourself wondering if they have completely survived your efforts and projects without any damage. One method of doing this is to test every single I/O pin, ADC... well you get the idea.

This ideas has been converted into a board by Carsten Tonn who has made a shield-type board which can run through every possible function to test an Arduino or compatible board. Furthermore it's great for testing sketches, for example you can use the LEDs to test output status and so on., 

This would also be good for a hackerspace or other environemnt where boards are lent out or otherwise used by others - the group can quickly isolate faulty boards. Either way, check out the project page for more information. 

And for more, we're on facebook,twitter and Google+ - so follow us for news and product updates as well.

When working on your own projects based on an Arduino Mega or EtherMega that require external circuitry or wiring - and you're not up for making a PCB - consider using a Freetronics Protoshield Mega. It includes the male header pins and a reset button to fit, and is also a little shorter to allow space for the RJ45 socket on an EtherMega. For more information and to order, visit the product page

November 10, 2014

Build a solar-powered heart rate monitor with Arduino

Although still in the development stage, this project by Instructables member DangerousTim is an interesting addition to the world of Arduino. It was developed as the cost of medical equipment in rural Africa and Asia was prohibitive - and without access to a reliable power supply this will offer the end user a more inexpensive way of allowing people to track their heart rate.

The monitor uses the principle of photoplethysmography (PPG), which "... is a non-invasive method of measuring the variation in blood volume in tissues using a light source and a detector. Since the change in blood volume is synchronous to the heart beat, this technique can be used to calculate the heart rate". A quick demonstration is shown in the following video:

This is a great, non-invasive solution to a very common problem - so visit the Instructable page to follow the project. And for more, we're on facebookGoogle+, and twitter - so follow us for news and product updates as well.

If you're looking for an Arduino Uno-compatible board to embed into various projects, choose what tens of thousands of others have done and use our Freetronics Eleven - the Arduino-Uno compatible with low-profile USB socket, onboard prototyping space and easy to view LEDs: 

November 07, 2014

Experimenting with wireless control of the Freetronics CUBE4 RGB LED Cube

Our CUBE4: RGB LED Cube kit has many applications, from simple lighting effects right through to spectrum analyser displays and system notifications. Furthermore various customers have been working on remote control of the cube, and Freetronics forum member dparson has demonstrated how to have two-way communcation with the cube using inexpensive nRF24L01+ data transceivers.

After some work with the cube's Arduino library, the SPI bus and some trial-and-error, the system is now complete and the cube can be controlled from a remote Arduino or other device with serial output to another nRF24L01+. For an indepth explanation of this, sit back and watch the following video:

For more information and discussion, visit the Freetroncis forum. And for more, we're on facebook, twitter and Google+, so follow us for news and product updates as well.

If you're interested in this project, or building your own RGB LED cube - check out our CUBE4: RGB LED cube kit:


It's easy to construct and use, and with an onboard Arduino-compatible board the cube can be used to display all sorts of data or create visual effects. It's easily controlled via simple text commands via the USB port - or write your own Arduino sketch. It's incredibly customisable and there's so much more. For more information and to order, visit the CUBE4 page