November 24, 2014

Hacking a "Looping Louie" Board Game with Arduino

After playing the board game "Looping Louie", the folks from the GreatScottLab decided to take the game further and add an Arduino-powererd control panel to the motorised aeroplane with is the focus of the game.

With a simple Arduino-compatible motor control circuit, and a neat user-interface based around a character LCD - the players can increase the difficulty of the game (or make it much easier) by controlling the speed of the rotating plane. With such a simple DC motor for the game, it was begging to be modified - which is demonstrated well in the following video:

There's a lot of opportunity for increased gameplay or unintended effects - so either way, check out the project page to learn how.  And for more, we're on facebookGoogle+, and twitter - so follow us for news and product updates as well.

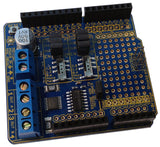
 If you're looking into starting with Arduino and robotics, such as controlling a stepper motor (or DC motors) from your Arduino or compatible, check out our new HBRIDGE: DC/stepper motor shield. Based around the powerful Allegro A4954 H-bridge driver IC you can control two DC motors with complete ease, or one bipolar stepper motor. With connections for external power management, a complete beginners' guide and documentation - motor control couldn't be any easier. For more information and to order, visit the HBRIDGE: page.

November 24, 2014

Check for cold drafty air with Arduino

Although there's many temperature-reporting projects out there based on various sensors, this project by Instructables user Blockman301 is an interesting alternative. Instead of just reporting whether the temperature has risen or fallen from a set level - it instead takes the average temperature over time to determine what is "normal", and then detects if the temperature has suddenly dropped.

This can be useful when searching for drafts though windows, doors or areas where HVAC isn't effective. The system uses inexpensive thermistors which are measured with an Arduino-compaible circuit to determine temperatures, and the sketch can take care of the rest. The interface is quite simple, and switches between a green and red LED when the temperature has altered.

For more details on how to recreate your own version, visit the project page. And for more, we're on facebook, twitter and Google+, so follow us for news and product updates as well. 

If you're wanting to make your own Arduino-compatible project such as the monitor above, you'll need an ATmega328P MCU with Arduino Uno bootloader:

This is the same Atmel AVR ATmega328P microcontroller used in the official Arduino Uno, as well as our ElevenEtherTenUSBDroid, and other boards. Perfect for building your own Arduino-compatible project directly on a breadboard or on a custom PCB, or for replacing the MCU in an existing board. Comes with the Arduino Uno bootloader pre-installed. Better still, it even has a special label stuck on top with details of the pinout, so you don't even need to look up the datasheet when connecting it up in your project! For more information and to order, click here!

November 20, 2014

The Robotic Urban Farm System

Hydroponic garden and technology enthuisast Paul Langdon has created an amazing automated hydroponic system that uses both Arduino and Raspberry Pi technologies to completely control a vertical hyrdoponic garden. Once completed, the system can monitor water levels, temperatures, the pH level of the water, offer remote control and monitoring from Internet-connected devices and alert the user when something is going wrong.

Several Arduino or compatible boards are used which are networked to a Raspberry Pi using I2C to allow all system parameters to be monitored and updated in real time. The Raspberry Pi is further used to maintain a historical log of all the systems running data and make it available via a set if web services. This really is the way of the future, and shown in the following video:

For a very interesting description, visit the project page. And for more, we're on facebookGoogle+, and twitter - so follow us for news and product updates as well.

For projects that require interaction between an Arduino and a Raspberry Pi (such as the RUFS above) you can save time and space by using our new PiLeven board:

The PiLeven is an Arduino-compatible board based on the Arduino Uno, but with a few changes. Obviously it's a bit of a strange shape! The PiLeven fits right on top of a Raspberry Pi (either model B or B+) using the Raspberry Pi expansion headers.

The PiLeven also has a high-current switchmode power supply, so you can plug in anything from 7V to 18Vdc using the standard 2.1mm jack. The PiLeven can power the Raspberry Pi, so you don't need a regulated 5V USB connection anymore.

Serial communications on the PiLeven is linked through to the Raspberry Pi, so your Pi can upload new sketches straight to the PiLeven or send/receive data and commands. We've included level shifters so the 3.3V Pi can talk safely to the 5V PiLeven. And you can plug standard Arduino shields right into the PiLeven, giving your Raspberry Pi access to the huge range of shields already available. For more information about the PiLeven, including our tutorials - and to order yours today, visit the PiLeven webpage.

November 19, 2014

The "Garage Genie" - Parking and remote control system

There's nothing new to having a remote-controlled garage door, however there's so much more room for expansion and integrating technology to make life better. Eric Tsai has demonstrated an Internet-enabled automation system that not only allows for control and monitoring of the garage, there's also a traffic light-style indicator showing how far the vehicle has entered the garage.

By using a combination of Ethernet-enabled Arduino hardware, MQTT and some clever coding you the user can check from afar if the garage is occupied, control the door and monitor the space from afar - as shown in the following video:

For complete details, check out Eric's project page. And for more, we're on facebookGoogle+, and twitter - so follow us for news and product updates as well.


When putting together your next Internet-enabled Arduino - save time, space and money with the Freetronics EtherTen. Apart from being fully  Arduino Uno-compatible , it has onboard Ethernet, microSD socket, full USB interface (so you don't need a costly FTDI cable just to upload a sketch!) and supports optional  Power-over-Ethernet.

November 19, 2014

Build an Arduino-controlled two player Simon game

The classic memory game Simon has been recreated in many forms using the Arduino development platform, with an almost infinite amount of variations with regards to the controls and outputs. However Jason Poel Smith has taken things further and created a two-player version that allows the end user to add their own control types for the buttons.

By adding sockets connected to the four inputs for the game, almost anything can be used that closes the circuit, from connecting a piece of fruit to actual people, using each person's head as a button. You might want to be careful with that example. A quick demonstration is shown in the following video:

This would be a lot of fun, so to make your own start with reviewing the project page. And for more, we're on facebookGoogle+, and twitter - so follow us for news and product updates as well.

If you're looking for an Arduino Uno-compatible board to embed into various projects, choose what tens of thousands of others have done and use our Freetronics Eleven - the Arduino-Uno compatible with low-profile USB socket, onboard prototyping space and easy to view LEDs: 


November 18, 2014

Make an Arduino-controlled Ohm Meter

Making your own test equipment with an Arduino is always an interesting journey with analogue and digital electronics - and one example of this is an Ohm meter (to measure values of resistance) described by Praveen from Circuits Today.

His meter has an interesting auto-ranging input, which helps reduce the level of inaccuracy greatly. This could be improved even more with the use of very low tolerance resistors as well. 

The explanation of operation is quite interesting, so for more information visit the project's website. And for more, we're on facebookGoogle+, and twitter - so follow us for news and product updates as well.

Looking for a rapid-use LCD for your Arduino or compatible projects such as the ohm meter above? Save time and move forward with the Freetronics LCD & Keypad shield which contains a bright 16x2 character LCD and five buttons that can be read from only one analogue input pin:

November 17, 2014

Using the TM1638 LED Driver IC with Raspberry Pi

Now and again some very intersting and useful ICs can be found from domestic Chinese manufacturers, and one of these is the TM1638 by Titan Micro. It's a handy part that can drive eight seven-segment LED displays along with eight bicolour LEDs and monitor eight buttons - all with only using the SPI bus. Over the last few years using the TM1638 has been made easy with Arduino, and now this has been repeated for the Pi thanks to the effort of Martin Oldfield.

His examples allow control of the display, including a clock demonstration and also methods for reading the buttons fitted to popular TM1638-based modules. With a little effort you can harness these for fun without too much effort at all, so visit Martin's website to get started. And for more, we're on facebook, twitter and Google+, so follow us for news and product updates as well.

However if you need a fuller display for your Raspberry Pi, check out our 128x128 pixel OLED Module. With a diagonal size of 1.5" and 16,384 colours to select from, so almost anything is possible. Furthermore there's a microSD card socket, and removable tabs on each side which can hold LEDs and buttons:

And using the module is made simple - we have tutorials and drivers for both the Arduino and Raspberry Pi platforms - great for experimenters or those who use both systems.

Furthermore, check out the forum where members are already creating modified drivers to rapidly increase the display speed. For more information including our Quickstart guides - and of course to order - visit the OLED Module product page.

November 17, 2014

Turn your Raspberry Pi into a video capture unit

Although originally designed as an inexpensive computer to get children coding, the Raspberry Pi can now be found inside all sorts of projects as the heart of something more complex. One example of this is as a video capture unit, a stand-alone handheld storage camera that can be used without any effort at all.

With the additing of the housing it can be mounted as a dash-cam inside a vehicle, and an interesting modification would be to add an accelerometer to mark useful points in the recorder video for later analysis. Nevertheless for more information on making your own, visit the Raspberry Pi Spy website. And for more, we're on facebookGoogle+, and twitter - so follow us for news and product updates as well.

If you need to rig up some hardware interfacing to your Pi, one options is to use our PiBreak board. It provides labelled breakout pins for all GPIOs, a large prototyping area with solder pads, and power rails for easy power connection:

Furthermore the PiBreak also includes mounting hardware to firmly attach it to your Raspberry Pi using a nut, bolt, and spacer - and is compatible with all revisions of both model A and B Raspberry Pi computers. For more information about our PiBreak board, our Getting Started guide, and to order - visit the product page.

November 17, 2014

Build a giant countdown timer with Arduino

Our LED matrix DMD display boards have found a home in many applications, and another useful example has been documented by Darren yates from APCmag in Australia. This project uses the DMD as a display board for a neat countodown timer, which could be used to count up or down in seconds and minutes - and then sound an alarm at the end of the period.

Of course you could modify this with all sorts of options to meet your requirement - the Arduino "sketch" to control a DMD is very simple and also described in our tutorial. After a short period you will get an understanding of how to control the screens and use them in your own applications.

For more information about Darren's timer project - visit the APCmag website and their magazine. And for more, we're on facebookGoogle+, and twitter - so follow us for news and product updates as well. 

As used in the project mentioned above, check out our Freetronics Dot Matrix Displays. They're simple to use, yet very bright for indoor and outdoor situations. Available in various colours, the 32 x 16 LED matrix can display text and graphics quite easily - and can be daisy-chained together for extended displays. For more information, see our range of Dot Matrix Displays here

November 14, 2014

Make your own Arduino-controlled Spectrometer

There are various forms of electronic test equipment you can build with an Arduino-based circuit - however this spectrometer by Instructables member simonfrfr takes the concept of home-made equipement to a higher level. With some simple hardware, mostly derived from an old PC optical drive, you could make this in a weekend or so.

For the curious, a spectrometer is "is an instrument used to measure properties of light over a specific portion of the electromagnetic spectrum, typically used in spectroscopic analysis to identify materials", and for the scientifically-inclined this would be a lot of fun. For a quick explanation and demonstration, check out the following video:

For complete details, check out the spectrometer project page. And for more, we're on facebook, twitter and Google+, so follow us for news and product updates as well. 

If you're wanting to make your own Arduino-compatible project such as the spectrometer above, you'll need an ATmega328P MCU with Arduino Uno bootloader:

This is the same Atmel AVR ATmega328P microcontroller used in the official Arduino Uno, as well as our ElevenEtherTenUSBDroid, and other boards. Perfect for building your own Arduino-compatible project directly on a breadboard or on a custom PCB, or for replacing the MCU in an existing board. Comes with the Arduino Uno bootloader pre-installed. Better still, it even has a special label stuck on top with details of the pinout, so you don't even need to look up the datasheet when connecting it up in your project! For more information and to order, click here!