September 19, 2014

New Product - 9-DOF Inertial Measurement Unit (IMU) module

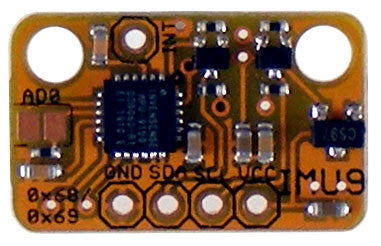
Are you interested in creating autonomous devices? A self-navigating robot, or perhaps even a drone or upgrading a remote-control plane or helicopter? Or would like to log all manner of motion and position data? Then our new 9-DOF Inertial Measurement Unit (IMU) module is just the ticket.

It offers not one but three sensors all into one amazing device:

  • Gyroscope
  • Magnetometer
  • Accelerometer

The combination of three sensors allows your Arduino or Raspberry Pi to detect things that just can't be done with a single sensor such as an accelerometer.

An accelerometer on its own is great for detecting static angle relative to the ground, or changes in motion, but it can't tell you what direction you're facing. The magnetometer is a fancy-shmancy 3D compass that provides you exactly that information.

Added to that, the gyroscope lets you detect changes in position, so by combining the data from all three sensors you can give your robotics projects a whole new level of data about what they are doing.

Best of all, there are handy libraries for both Arduino and Raspberry Pi to get you started. We even included an onboard voltage regulator and logic level shifters, so you can connect it directly to either 3.3V or 5V microcontrollers right out of the box. Just plug and play!

Our 9-DOF Inertial Measurement Unit module is now in stock and ready to ship, so for more information and to order - visit the 9-DOF Inertial Measurement Unit product page. And to keep up with news, products and more from Freetronics, please follow us on your choice of facebookGoogle+, and twitter.

September 19, 2014

Sending weather data via SMS and a Raspberry Pi

Although the original purpose of the following project may seem somewhat frivolous, it can be the framework for something much more useful. Enthusiast Ajay has documented a neat way for a Raspberry Pi to interrogate the weather forecase from an external website, then determine the approproate clothing type that should be worn and send this information via SMS.

The system is controlled via python code, and can be scheduled to run at a certain time. Finally the SMS is sent from the connected Raspberry Pi from the Twilio online service. This could be converted into many projects, such as monitoring a website for changes of various kinds or just creating SMS alerts from your Pi.

Either way, visit Ajay's interesting website to learn how. And for more, we're on facebookGoogle+, and twitter - so follow us for news and product updates as well.

If you're looking for a more permanent way to mount circuitry to your Raspberry Pi, check out our PiBreak - the prototyping board for the Raspberry Pi. It provides labelled breakout pins for all GPIOs, a large prototyping area with solder pads, and power rails for easy power connection:


Furthermore the PiBreak also includes mounting hardware to firmly attach it to your Raspberry Pi using a nut, bolt, and spacer - and is compatible with all revisions of both model A and B Raspberry Pi computers. For more information about our new PiBreak board, our Getting Started guide, and to order - visit the product page

September 18, 2014

New Product - Barometric Pressure Sensor Module

We're proud to announce our new Barometric Pressure Sensor Module that's ideal for for weather, industrial, rocketry, balloon, and many other pressure sensing applications. It's incredibly accurate and can detect changes of altitude around every thirteen centimeters - you can test it right at your desk.

Furthermore the module can operate on a wide range of supply votlages, and uses the I2C bus so it can be used with many other development platforms including Arduino and Raspberry Pi. And as always you can take advantage of our Quick Start guide to be up and running in no time at all.

Our Barometric Pressure Sensor module is now in stock and ready to ship, so for more information and to order - visit the Barometric Pressure Sensor Module product page. And to keep up with news, products and more from Freetronics, please follow us on your choice of facebookGoogle+, and twitter.

September 18, 2014

Build an optical tachometer with Arduino

If you've ever been curious about the speed of a fan or other rotary device then you will find the following project by Instructables member electro18
of interest. They've devised a neat and non-contact method of measuring RPM that only needs a small white piece on a section of the rotating device.

The tachometer then uses infra-red LED and a photodiode to bound IR light off the rotating device, and detects when the white piece has passed - and thus a revolution. Wiht the use of interrupts in the sketch the tachometer can measures speeds of up to around 20000 RPM. A quick demonstraiton is shown in the following video:

This could also be the basis for other projects such as making a speedometer for a bike or measuring the RPM of rotating shafts, pumps and so on. Either way, visit the project Instructable page for complete details.

And for more, we're on facebookGoogle+, and twitter - so follow us for news and product updates as well.

If you need to add external hardware or devices to your next Arduino project, you'll need a protoshield to mount the external circuitry. In doing so, consider our range of ProtoShields. From the tiny LeoStick to the Mega we have a wide range to suit your application.

September 18, 2014

New Product - Watchdog Timer module

If you Arduino-compatible or other mircocontroller product needs to run continuously, there may be a risk of a board lockup or failure. This can usually be due to unexpected events not being planned for in the code or perhaps power issues. No matter what the possible scenario is you can now have your Arduinor reset after one or five minutes by using our new Watchdog Timer Module:

The Watchdog Timer Module listens for a signal from your Arduino or other microcontroller - such as a HIGH signal from a digital output, and if one is not received in the required time the Watchdog will reset the Arduino. You can select between one and five minutes for the duration before resetting the Arduino or other board. And with our Quick Start guide you can add this functionality to your project in no time at all.

Our Watchdog Timer Module is now in stock and ready to ship, so for more information and to order - visit the Watchdog Timer product page. And to keep up with news, products and more from Freetronics, please follow us on your choice of facebookGoogle+, and twitter.

September 17, 2014

Build a solar-powered Arduino weather station

Moniroting various weather paramters such as temperature, humidity and barometric pressure is a popular pursuit for many reasons, and for those Arduino enthusiasts with a keen eye on the weather, the following project by Instructables member deba168 will be of interest.

They've demonstrated how to make a solar-powered weather station using Arduino and various sensors. The sensors are placed in a weatherproof enclosure along with a solar-powered rechargeable battery system which powers the electronics, which include a wireless data transmitter. The data is then send to another Arduino circuit indoors that uses a large LCD to display the weather data and also could be used for logging and analysis.

A great project with many applications, and all the details can be found on the project's Instructable page. And for more, we're on facebooktwitter and Google+, so follow us for news and product updates as well.

If you're looking to learn how to use an Arduino with sensors, wireless data transceivers, LCDs and much more, you can't go past reading a copy of "Arduino Workshop -  A Hands-On Introduction with 65 Projects” by John Boxall.

Arduino Workshop takes the reader from having zero knowledge about the Arduino platform, electronics and programming and leaves them with the know-how and instructions on everything from blinking an LED, to robotics, wireless data, cellular communications, motor control, sensors, Internet connected systems and more. For more information including a sample chapter and table of contents, visit the book page.

September 17, 2014

Send text from an Android device to Arduino via Bluetooth

It's always neat to see new ways of sending data from Android devices to an Arduino - and one of the most obvious is via Bluetooth, however to the casual experimenter this may seem a little out of reach. However nothing could be further from the truth, and thanks to Mauricio Hidalgo you can achieve this in a short period of time.

Mauricio demonstrates how to send text entered by a user into an Android app to an LCD connected to an Arduino - using a Bluetooth link from the phone to the electronics. The app has been created in the free MIT/Google Android App Inventor - which allows you to make your own apps using a simple drag-and-drop envinroment. Finally the results are demonstrated in the following video:

Although this may seem a little simple, it's a great framework and introduction to working with Android apps and Arduino - so to gets started, visit Mauricio's interesting website. And for more, we're on facebookGoogle+, and twitter - so follow us for news and product updates as well.

To reproduce the system above you'll need an LCD and also a Bluetooth device for your Arduino projects, and to meet this need we've released our new Freetronics Bluetooth Shield:


We've made it simple to use - the Bluetooth Shield acts as a serial link between the other Bluetooth device. Furthermore there's a wide range of jumpers allowing you to select which digital pins to use for data transfer, increasing compatibility with other shields. And with our Quick Start guide it's easier than ever.

Our Bluetooth Shield for Arduino is now in stock and ready to ship, so for more information and to order - visit the shield's product page.


September 16, 2014

Using Arduino to monitor FitBit activity data

Users of the wearable activity monito FitBit may or may not be that enthusiastic with regards to meeting their daily step or movement target. For some of us it's easy to put off the exercise and work on other things instead. However Joe Flasher has found some synergy between FitBit and Arduino by describing how to extract activity data from the FitBit servers.

Once this data has been received, it is sent to a waiting Arduino connected via usb with some python code - at which point it's up to you as to what can be done. For example if you haven't been active for a period of time - anything from a blinking LED to a car horn could be activated to get you moving again. Doing so is relatively easy and would make a great project for the desk-bound person who could use more exercise.

The only catch is that your FitBit need to be able to sync automatically when required. Nevertheless for more information and code, check out Joe's github page. And for more, we're on facebookGoogle+, and twitter - so follow us for news and product updates as well. 

Have you been reading about Arduino and would like to understand more so you can work with projects like the example above, but not sure where to start? Then order one of our Experimenter's Kit for Arduino: 

The package includes a wide variety of parts, sensors and modules including: a servo motor, lights, buttons, switches, sound, sensors, breadboard, wires and more. Furthermore a Freetronics Eleven Arduino-compatible board is included to make this an extensive hobby experimenter, inventor and starter kit. 

However we don't leave you alone to figure it all out, included is a great project and instruction booklet, plus access to a supporting web page and software examples. In other words - this is everything you need to get started for a fun range of electronics and Arduino related projects! So to get started or for more information and to order, check out the product page.

September 16, 2014

Convert an inkjet printer into a coffee art printer

And now for something completely different comes this inkjet printer hack by Belal Affouri. He's modified a Canon IP3600 inkjet printer in conjunction with parts from another and a flatbed scanner to create a device that can print on top of a coffee, using the foam or crema surface as the canvas.

An Arduino is used to control the printhead's position via a stepper motor, and also wired into the printer mechanism for print control and also trick the printer into thinking paper is present. Finally real ink isn't used, instead the cartridge is refilled with edible ink. A quick demonstration of the process is shown in the following video:

To learn how this was done including the Arduino sketch, check out Belal's Instructable page. And for more, we're on facebook, twitter and Google+, so follow us for news and product updates as well.

 There's so much you can do with an Arduino and motors - and the base of any project is a solid motor shield - such as our HBRIDGE: DC/stepper motor shield. Based around the powerful Allegro A4954 H-bridge driver IC you can control two DC motors with complete ease, or one bipolar stepper motor. With connections for external power management, a complete beginners' guide and documentation - motor control couldn't be any easier. For more information and to order, visit the HBRIDGE: page.


September 16, 2014

Prank computer users' keyboard with Arduino

There may come a time when you need to play a joke on someone, perhaps something harmless that will cause some frustration and laughs over the course of a day. One interesting way of doing this is to use an Arduino Leonardo or compatible board to emulate a USB keyboard and mouse.

Although that has a practical use, you can also create random keyboard and mouse events over a period of time, that could emulate the feeling of the computer doing things for itself and generally malfunctioning. This has been demonstrated by loiphin who uses a Leonardo-compatible board to play the role of a secondary USB keyboard and mouse to annoy an end user. And by covering it in heatshrink as shown below, it will be less-easily found by the target.

Certainly something different, however take care with the possible results of your jokes. The sketch and more information can be found on loiphin's blog. And for more, we're on facebookGoogle+, and twitter - so follow us for news and product updates as well.

Need a small Arduino-compatible for use with your own projects? Then check out out our LeoStick. It's the Arduino Leonardo-compatible board that's cheaper and smaller than the original:

 Apart from being one of the smallest Arduino-compatibles on the market with USB, it also has an onboard RGB LED and piezo which can be used a knock sensor and various tune and sound effects. Plus you can add extra circuitry with the matching protostick! For more information and to order, click here.