September 09, 2014

Use NodeJS and Arduino to build a weather display

It's always interesting to learn about new methods of interaction with an Arduino-compatible board, and today we'd like to share one by Todd Lawton who documents how to use NodeJS and the Johnny-Five programming framework to create a simple weather display using an Arduino's LCD. 

All the coding work runs on the PC side thanks to the use of the Firmata sketch loaded onto the Arduino, and Todd explains the required Javascript code to initalise the Arduino, set up the LCD and also retrieve weather data from an external site to display on the LCD.


Even if you're not interested in the weather display, the tutorial is an interesting glimpse into alternative Arduino control methods, so to get started visit Todd's website. And for more, we're on facebookGoogle+, and twitter - so follow us for news and product updates as well.

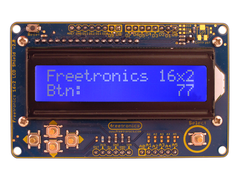
Looking for a rapid-use LCD for your Arduino or compatible projects? Save time and move forward with the Freetronics LCD & Keypad shield which contains a bright 16x2 character LCD and five buttons that can be read from only one analog input pin:

September 08, 2014

Custom Arduino control from Android devices via Bluetooth

You may have seen various remote-control applications from an Android device and been able to complete the hardware side of the project - however found the concept of writing your own Android app too far out of reach. However there are tools to make the Android side of things simple and one of these is called pfod™ - for "Protocol For Operations Discovery".

With this software tool you can create your own user interface which can then be used to send commands to your Bluetooth-enabled Arduino projects. Which then gives you scope for all sorts of remote-control possibilities. The process of doing this has been demonstrated by Instructables user drmpf and after a short period of time you'll see how easy it can be.

Furthermore by using a smartphone for remote control not only is the data link easier to control, your friends and associates will be amazed at your technical prowess. So to get started, check out the project Instructable page. And for more, we're on facebookGoogle+, and twitter - so follow us for news and product updates as well.

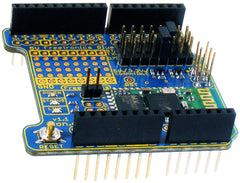
As part of the pfod experience you'll need a Bluetooth device for your Arduino projects, and to meet this need we've released our new Freetronics Bluetooth Shield:


We've made it simple to use - the Bluetooth Shield acts as a serial link between the other Bluetooth device. Furthermore there's a wide range of jumpers allowing you to select which digital pins to use for data transfer, increasing compatibility with other shields. And with our Quick Start guide it's easier than ever.

Our Bluetooth Shield for Arduino is now in stock and ready to ship, so for more information and to order - visit the shield's product page.

September 08, 2014

Build a USB Mouse "Wiggler" device with a Freetronics LeoStick

Thanks to the compact format of our LeoStick Arduino Leonardo-compatible board, they can be found in all sorts of useful situations. One of these has been described by Freetronics forum member plainolddave who has used a LeoStick to solve a common problem - stopping the screen-saver of a PC coming on when running software that doesn't need constant user input.

As the LeoStock can emulate a USB HID such as a keyboard or mouse, the sketch simply emulates the "wiggle" of a USB mouse and thus preventing the screen-saver from starting. The LeoStock can easily be added or removed when required and nearly solves the problem without any extra hardware. You can review the sketch and make your own from the project github page. And for more, we're on facebookGoogle+, and twitter - so follow us for news and product updates as well.

Need a small Arduino-compatible for use with your own projects? Then check out out our LeoStick. It's the Arduino Leonardo-compatible board that's cheaper and smaller than the original:

 Apart from being one of the smallest Arduino-compatibles on the market with USB, it also has an onboard RGB LED and piezo which can be used a knock sensor and various tune and sound effects. Plus you can add extra circuitry with the matching protostick! For more information and to order, click here.

September 08, 2014

Build a custom Word Clock with Arduino

One of the more popular advance Arduino projects to build is a "Word Clock" - a clock that displays the time in actual words, in a sentence form as you would articulate in speech. Wouter Devinck has taken this idea to another level and made a clock that more than meets the standards of a commercial product.

Based around an Arduino-compatible circuit Wouter's clock is constructed with custom PCBs, a glass panel that has been cut to shape and a sticker containing the cutouts of all the letters with which the LEDs can illuminate to create the required text. And unlike other versions, each LED is addressable which gives the user more options to create interesting displays of data or simply patterns between displaying the time. You can view the clock in action through the following video:

For information about the build and links to all the design files, visit the word clock's project page. And for more, we're on facebooktwitter and Google+, so follow us for news and product updates as well.

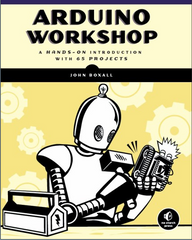
If you're looking to learn how to use an Arduino with LEDs, sensors and much more, you can't go past reading a copy of "Arduino Workshop -  A Hands-On Introduction with 65 Projects” by John Boxall.

Arduino Workshop takes the reader from having zero knowledge about the Arduino platform, electronics and programming and leaves them with the know-how and instructions on everything from blinking an LED, to robotics, wireless data, cellular communications, motor control, sensors, Internet connected systems and more. For more information including a sample chapter and table of contents, visit the book page.

September 06, 2014

New Product - Bluetooth Shield for Arduino

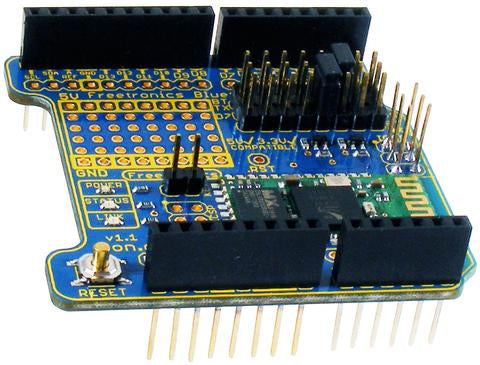
The first of a new range of products has just landed, and we're proud to announce it's our Bluetooth Shield for Arduino. This offers a very easy way to communicate between your Arduino or compatible board and a Bluetooth-equipped PC, smartphone or even another Bluetooth-equipped Arduino.


We've made it simple to use - the Bluetooth Shield acts as a serial link between the other Bluetooth device. Furthermore there's a wide range of jumpers allowing you to select which digital pins to use for data transfer, increasing compatibility with other shields. And with our Quick Start guide it's easier than ever.

Our Bluetooth Shield for Arduino is now in stock and ready to ship, so for more information and to order - visit the shield's product page. And to keep up with news, products and more from Freetronics, please follow us on your choice of facebookGoogle+, and twitter .

September 05, 2014

Efficient multitasking on your Arduino with OS47

When creating more complex Arduino-based projects, there may come a time when you really need system to do two things at once - and the hardware interrupts may not be useful enough. Apart from changing to a different platform, there hasn't really been that many options - until now. Thanks to the OS47 kernel library by Yves Demirdijan you can create a system that can multitask functions with either pre-emptive or co-operative multitasking.

Installtation is easy as this acts in the same way as an Arduino library, and as the code is written in C you can modify further for your own needs. Apart from the actual OS47 download, Yves has provided a tutorial on the software and also some theoretical explanations to help get you up to speed with the concepts. Due to the low-level requirements of the code, OS47 is currently only compatible with the ATmega328P found in Arduino Uno and compatible boards.

To get started, visit the OS47 page for information and download links. And for more, we're on facebookGoogle+, and twitter - so follow us for news and product updates as well.

If you're looking for an Arduino Uno-compatible board for various projects, choose what tens of thousands of others have done and use our Freetronics Eleven - the Arduino-Uno compatible with low-profile USB socket, onboard prototyping space and easy to view LEDs: 

September 04, 2014

Play tiny Role-playing Games with Arduino

With some imagination, clever coding and a little work you can have a lot of fun with the Arduino platform - and a great example of this has been published by Krzysztof Jankowski. Their project is a role-playing game that's hosted by an Arduino and a typical LCD display.

The player is controlled with some external buttons, and custom characters for the LCD help increase the quality of game play and also help demonstrate how to get the most from these displays. A quick demonstration of the game is shown in the following video:

For more images of the game and links to the sketch download, visit Krzysztof's interesting website. And for more, we're on facebookGoogle+, and twitter - so follow us for news and product updates as well.

Looking for a rapid-use LCD for your Arduino or compatible projects? Save time and move forward with the Freetronics LCD & Keypad shield which contains a bright 16x2 character LCD and five buttons that can be read from only one analog input pin:

September 04, 2014

Laser-cut stands for the Freetronics Dot Matrix Display

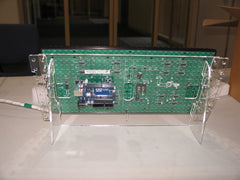
It's always great to see our products "out in the wild" - whether they're used in interesting situations, or if our customers have added value to them. One great example of this is by Instructables member switch62 who has published details on making a nice desk stand for our DMD Dot Matrix Display units.

The stands are assembled from laser-cut pieces of 3mm acrylic sheets, and go together to form the stand as shown below. Furthermore there's mounting holes to keep an Arduino Uno or Freetronics board tucked up neatly behind the display, making the entire unit relatively self-contained.

For more on this neat stand including relevant design files, visit the Instructable page. And for more, we're on facebookGoogle+, and twitter - so follow us for news and product updates as well. 

As used in the project mentioned above, check out our Freetronics Dot Matrix Displays. They're simple to use, yet very bright for indoor and outdoor situations. Available in various colours, the 32 x 16 LED matrix can display text and graphics quite easily - and can be daisy-chained together for extended displays. For more information, see our range of Dot Matrix Displays here

September 04, 2014

Relive classic computer games with a Raspberry Pi-powered Arcade Cabinet

Many years ago some of us may have spent a lot of money playing arcade games in the corner store or arcade hall - and never moved on from wanting a good round classic titles. This can again be possible without the piles of 20 cent pieces, by instead making your own cabinet and powering the sysem with a Raspberry Pi.

DJ from Instructables has published a neat tutorial that details the hardware and software required to do jus that, by creating a custom-made table from plywood and fitting an inexpensive LCD television the same effect can be had for much less than the cost of a refurbished original. Wiring arcade-quality buttons to the Raspberry Pi is explained, and you can be playing in no time.

For more details, links and a lot of inspiration check out the cabinet's Instructable page. And for more, we're on facebook, twitter and Google+, so follow us for news and product updates as well.

If you enjoy classic games on your Pi, but on a smaller scale - consider our 128x128 pixel OLED Module. With a diagonal size of 1.5" and 16,384 colours to select from, so almost anything is possible. With the extra OLED shield fitting is a breeze. Furthermore there's a microSD card socket, and removable tabs on each side which can hold LEDs and buttons:


And using the module is made simple - we have tutorials and drivers for both the Arduino and Raspberry Pi platforms - great for experimenters or those who use both systems. Furthermore, check out the forum where members are already creating modified drivers to rapidly increase the display speed. For more information including our Quickstart guides - and of course to order - visit the OLED Module product page

September 02, 2014

The Arduino-powered illuminated Poker Table

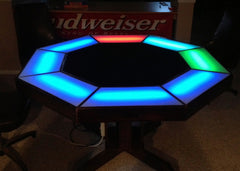
If you're a Poker-playing Arduino enthusiast then the following project by Justin Trzeciak will be of interest. He's modified a typical card table by adding a networked Arduino that can control RGB LEDs mounted in front of each player's position. The illuminations are used to indicate the status of each player, or just be controlled for a visual effect.

The system is controlled via a web page which is hosted on a local server that's connected to the Arduino, and allows for simple control from a smartphone or other web-connected device on the local network.

Even if you're not interested in card games, this project offers a neat framework for controlling connected Arduino-based projects. To get started, more information and links to the code - visit Justin's table website. And for more, we're on facebook, twitter and Google+, so follow us for news and product updates as well.

If you're looking to make your own colourful LED-based project, consider our Freetronics RGBLED: full colour module. It includes a bright RGB LED on the top of the board and a WS2801 constant-current, addressable, multi-channel LED driver on the back. This smart module can be daisy-chained, so you can connect a number of these together in a string and drive each of the module colours individually from your microcontroller. For more information and to order, visit the product page.