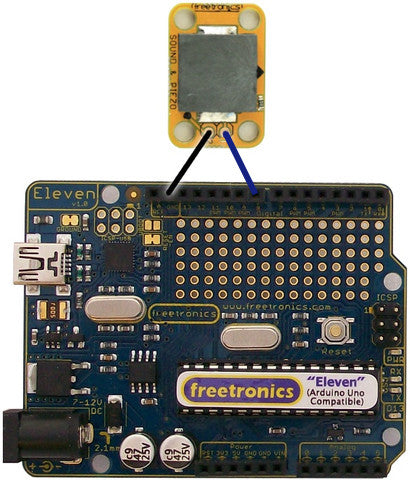
The Sound and Buzzer Module can be used as either an output for creating sound, or as an input for detecting vibration or knocks.
Module Pinout

The module is not polarised, so you can connect it in either orientation.
Sound Output
To generate tones the Sound and Buzzer Module should have one connection linked to GND (0V) on your microcontroller and the other connection linked to a digital I/O pin. By toggling the pin on and off at a high frequency, it is possible to generate tones.
In this example we connected pin 2 of the module to GND, and pin 1 of the module to digital I/O pin D8.

The Arduino IDE includes a library called "tone" that makes it easy to play tones and simple melodies.
To get started, open the Arduino IDE and choose the menu item File -> Examples -> Digital -> toneMelody. This example sketch will play "Shave and a Haircut" on the SOUND module connected to digital pin 8.
Playing Notes
The toneMelody sketch also includes a very helpful file called "pitches.h" which contains a mapping from individual musical notes (like "A") to their frequencies in Hz (like "440"). This makes it easy to play melodies by knowing which frequency corresponds to which note. You can find this file inside the Arduino IDE directory under "examples/02.Digital/toneMelody/", and copy it from there to the directory containing your own sketch.
Knock Detection
The Sound and Buzzer Module contains a piezo-electric element that can be used to detect vibrations or sharp knocks. The module includes a built-in 1M resistor, so you don't need to add any other parts to use it as a knock sensor.
Detection of vibration is performed by measuring the voltage across the module terminals. To do this, connect one terminal to GND (0V) on your microcontroller and the other terminal to an analog input pin. In this example we've used A0.

The Arduino website has a tutorial explaining how to do knock detection at http://www.arduino.cc/en/Tutorial/Knock, including the following example sketch by David Cuartielles and Tom Igoe. Copy and paste this code into the Arduino IDE and upload it to your Arduino with the Sound and Buzzer Module connected as shown above, then open the serial console in the IDE with the baud rate set to 38400bps to match the setting in the sketch. Place the Sound and Buzzer Module on a hard surface such as a table top, and tap on the sensor or nearby to see the effect. When the Arduino detects a knock it will send the message "Knock!" to the serial console.
const int ledPin = 13;      // led connected to digital pin 13
const int knockSensor = A0; // the piezo is connected to analog pin 0
const int threshold = 100;  // threshold value to decide when the detected sound is a knock or not

int sensorReading = 0;      // variable to store the value read from the sensor pin
int ledState = LOW;         // variable used to store the last LED status, to toggle the light

void setup() {
 pinMode(ledPin, OUTPUT); // declare the ledPin as as OUTPUT
 Serial.begin(38400);     // use the serial port
}

void loop() {
  // read the sensor and store it in the variable sensorReading:
  sensorReading = analogRead(knockSensor);

  // if the sensor reading is greater than the threshold:
  if (sensorReading >= threshold) {
    // toggle the status of the ledPin:
    ledState = !ledState;
    // update the LED pin itself:
    digitalWrite(ledPin, ledState);
    // send the string "Knock!" back to the computer, followed by newline
    Serial.println("Knock!");
  }
  delay(100);  // delay to avoid overloading the serial port buffer
}


