The 4-Channel Relay Driver Module makes it simple and convenient to drive loads such as 12V relays from simple 5V digital outputs of your Arduino compatible board or other microcontroller. You can use any of the control channels independently, so simply leave any unused channels disconnected.
Module Pinout

Logic GND: Connect to GND on your microcontroller.
Input 1: Connect to a digital output from your microcontroller, or leave unconnected if channel not used.
Input 2: Connect to a digital output from your microcontroller, or leave unconnected if channel not used.
Input 3: Connect to a digital output from your microcontroller, or leave unconnected if channel not used.
Input 4: Connect to a digital output from your microcontroller, or leave unconnected if channel not used.
Relay power +: Connect to the positive (+) lead of the power source for your relays. Can be 5 to 24V DC.
Relay power -: Connect to the negative (-) lead of the power source for your relays.
Relay 1 +: Connect to the + side of the coil of your first relay.
Relay 1 -: Connect to the - side of the coil of your first relay.
Relay 2/3/4 +: As per Relay 1 +.
Relay 2/3/4 -: As per Relay 1 -.
Basic Connections
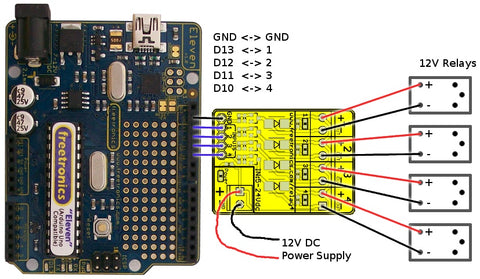
Connect from 1 to 4 channels to your microcontroller and relays as required. In this example we've connected to D10 through D13 on the Eleven. This is a particularly convenient method because it can also be done by fitting a 5-pin male breakaway header to the 4-Channel Relay Driver Module, and plugging it directly into the Arduino header so that GND on the module aligns with GND on the header.

Relays are connected directly to each output channel. In many tutorials about relays you will see instructions that you must include a protection diode across the relay terminals. You do not need to do that when using the 4-Channel Relay Driver Module, because the protection diodes are built in to the module itself.
Example Sketch
Driving the relay channels is very simple. All you need is to set the matching microcontroller output HIGH to turn a channel on, or LOW to turn a channel off. Even the standard "Blink" example included with the Arduino IDE will work perfectly with no changes at all if you have a relay channel connected to Arduino pin D13, with the relay connected to that channel turning on or off once per second.
With the 4-Channel Relay Driver Module connected to a Freetronics Eleven or other Arduino-compatible board as shown in the example above, the following sketch will allow you to activate any channel manually.
1. Copy and paste the sketch into the Arduino IDE.
2. Compile and upload the sketch to your Arduino.
3. Open the serial console in the Arduino IDE, make sure the speed is set to 38400, and type "0" then <enter> to turn off all relays or the number of a relay channel followed by <enter> to activate that relay.
/**
 * Example sketch to control the RELAY4 4-Channel Relay
 * Driver Module.
 *
 * Connect module inputs to Arduino pins D13, D12, D11,
 * D10. Open serial console at 38400 baud, and send
 * value "0" to reset all relays, or a channel number to
 * activate that relay.
 */
#define CHANNEL1 13
#define CHANNEL2 12
#define CHANNEL3 11
#define CHANNEL4 10

byte command = 0;

void setup()
{
  Serial.begin(38400);
  Serial.println("RELAY4 demonstration starting up");
  pinMode(CHANNEL1, OUTPUT);
  pinMode(CHANNEL2, OUTPUT);
  pinMode(CHANNEL3, OUTPUT);
  pinMode(CHANNEL4, OUTPUT);
  resetAllChannels();
  Serial.println("Ready. Type 0 to reset all relays, 1 - 4 to activate a relay.");
}

void loop() {
  if (Serial.available()) {
    command = Serial.read();
    if( command == '0' )
    {
      resetAllChannels();
      Serial.println("Resetting all channels");
    }
    if( command == '1' )
    {
      digitalWrite(CHANNEL1, HIGH);
      Serial.println("Activating relay 1");
    }
    if( command == '2' )
    {
      digitalWrite(CHANNEL2, HIGH);
      Serial.println("Activating relay 2");
    }
    if( command == '3' )
    {
      digitalWrite(CHANNEL3, HIGH);
      Serial.println("Activating relay 3");
    }
    if( command == '4' )
    {
      digitalWrite(CHANNEL4, HIGH);
      Serial.println("Activating relay 4");
    }
  }
}

void resetAllChannels()
{
  digitalWrite(CHANNEL1, LOW);
  digitalWrite(CHANNEL2, LOW);
  digitalWrite(CHANNEL3, LOW);
  digitalWrite(CHANNEL4, LOW);
}


